Lotus Rising Healing & Wellness
  • Programs Offered
    • Psychotherapy
    • Hypnotherapy
    • Private Coaching
  • Book an Appointment
  • About Me
  • Contact

Homemade Gluten-Free, Whole Grain Crackers

11/2/2013

0 Comments

 
Picture
If you want some healthy crunch and you have a little creativity, you can do almost anything with this recipe! It's super simple and fairly easy (meaning you have to play around with them a bit to get them perfectly crunchy, but not burned). You can use cookie cutters to cut out any shape you like or just use a pizza cutter to score them into squares. You can also use a toothpick to poke holes in them so they look just like regular crackers, especially if you have picky eaters.

Herb and Dulse Crackers

Yield: about 24 crackers
 
Time: 5 minutes (active), plus baking time, which varies a bit

Ingredients:


• 1 cup quinoa flour (if you have a Blendtec Blender, you can use whole quinoa and just blend it on the 'Grind Grain' setting to make flour)

• 1/2 cup millet flour, same as above

• 1/2 cup chia seeds, I also grind these but you can use them whole as well

• 1/2 tsp dried thyme (Feel free to use any herbs you have on hand such as Italian Seasonings or even cinnamon, nutmeg and some Stevia powder and honey for a sweeter version).

• 1/2 tsp dried parsley

• 1 tsp Dulse flakes


• 1 tsp Celtic Sea Salt (add a bit more if you like your crackers really salty)

• 1 tbsp extra virgin olive oil

• 1/3 - 2/3 cup cold, filtered water (I start with 1/3 cup and add as needed until you have a thick dough that is spreadable. I found 1/3 cup to be too little water.)

Instructions:

 1. Preheat the oven to 350 degrees F


2. Combine all ingredients in a food processor or Blendtec Blender which is what I use and pulse until smooth.

3. Place a sheet of parchment paper on a baking sheet. Grease sheet with a small amount of olive oil. Put about 1/3 of the cracker dough in the middle of the sheet. Press down with a spatula. Now, get your hands wet with water and begin pressing the dough down flat, re-wetting hands as needed to press the dough as thin as possible, about 1/8 inch. 

4. Score the crackers into the size and shape you like with a pizza cutter or sharp knife (or make shapes with a cookie cutter). Poke holes in crackers with a toothpick if you like and bake the crackers for about 13 minutes, then flip them over and remove parchment paper. Bake 5 to 7 more minutes until they are fairly firm and golden brown, but not too brown. This is where it gets a little tricky. Every oven is different so just watch them and make sure they become golden brown, but not burned! Turn oven off, open the door to let some heat out for about 1 minute and then allow the crackers to sit in the 'turned off' oven another 1/2 hour or so until they are perfectly crisp. Remove from oven and allow to cool completely, if you can before you eat them:)

Picture
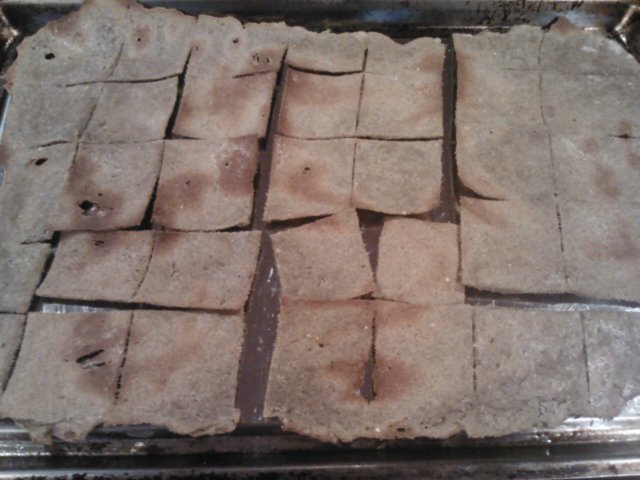
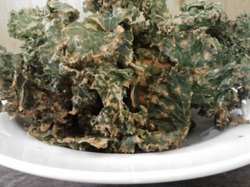
I took this picture after the initial 13 minutes.
Picture
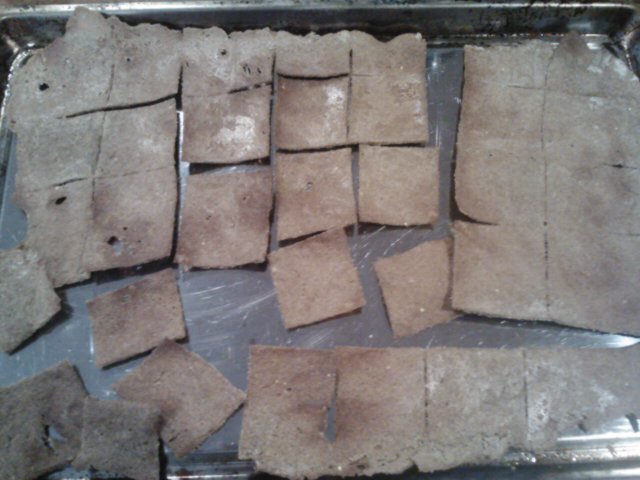
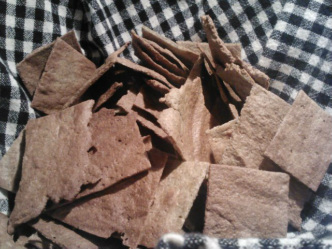
This is after the next 5 minutes just before I turned the oven off for them to sit. The picture of the crackers in the basket is after they sat in the oven for another 1/2 hour. The golden brown evens out!
This recipe is adapted from the Body Ecology Menu Plan Week 15.
This is one of my favorite, healthy meal plans because the recipes are simple and very healing while also tasting great!

Maria Rippo is a Transformational Weight Loss & Wellness practitioner with an online as well as a local practice in Bothell, WA.This article Copyright 2013 by Maria Rippo, all right reserved. To replicate or use any portion of this article, please do so in its entirety including this text or contact the author at [email protected].
0 Comments

Super Simple Oven Baked Kale Chips

10/26/2013

0 Comments

 
Picture
Picture
I have never mastered the art of oven dehydrating. I tend to burn things before they are crisp, so I usually use my dehydrator for things like this, but that takes a while. So, I keep trying and I finally mastered simple oven baked kale chips! These are so quick and I couldn't keep the kids away from them:)

Ingredients:

2 bunches of kurly kale

2 TBS olive oil

Celtic or Himalayan salt to taste

Freshly ground pepper to taste, if desired

Instructions:

Preheat oven to 350ᵒ F. Rinse the kale and tear it  off the stem into large pieces, as the pieces will shrink considerably as you can see in the photo above. Place pieces of kale into a bowl.
Drizzle with olive oil and massage the oil into the kale. Spread pieces into a single layer on baking sheets lined with parchment paper or Silpat mats. Sprinkle with salt and pepper.

Bake for 10 - 15 minutes, or until crisp. To make them extra crisp, I turn the oven off, let some heat out and leave the kale in the oven for about an hour to dehydrate fully.

You might also like:

Cheezy Vegan Kale Chips

Avocado Kale Salad

Cranberry-Apple Kale Salad Heaven!

Maria Rippo is a Transformational Weight Loss & Wellness practitioner with an online as well as a local practice in Bothell, WA.This article Copyright 2013 by Maria Rippo, all right reserved. To replicate or use any portion of this article, please do so in its entirety including this text or contact the author at [email protected].


0 Comments

Cheezy Vegan Kale Chips Recipe

8/4/2013

1 Comment

 
Picture
If there is one snack my kids beg me to make over and over, its my cheezy kale chips. They are even very willing to help, so it's a great way to spend some time together while also accomplishing a task (my favorite way to do it!), as long as mama is in a good mood and not too task oriented. When I am, that usually makes for a less than pleasant kale chip-making experience for the kids. You know how it goes, you want it to be efficient and work out perfectly.... always a mothering disaster for me, so if your kids are with you, take a deep breath and be prepared to laugh a lot!

Now that you're prepared to be a fun mom:), here are the ingredients you'll need:

2 large bunches of curly kale
1 lemon
2 red bell peppers
1 1/2 cups soaked raw cashews. (place cashews in a bowl of very warm water for about an hour, then strain and rinse)
Himalayan or Celtic salt to taste, I use about 1/2 - 2 tsp, starting with one and tasting before adding more. You'll want them to be nice and salty!
5 TBS nutritional yeast
Dash of cayenne pepper

Chop the red bell pepper and add to blender or food processor with the juice of one lemon. Blend until smooth. Add the cashews, 1/2 tsp salt, a dash of cayenne pepper and blend again until smooth. Next add nutritional yeast and blend again. Devein the kale, meaning, remove the center stalks. Tear kale into the large pieces as they will shrink when dehydrated. Place in a large bowl and pour marinade over kale. Massage marinade into kale so all of it is well covered. Let sit for about 15 minutes, unless you're in a hurry, in which case, skip this step.

Place the kale on dehydrator trays lined with parchment paper. This recipe does not work in the oven b/c the marinade is too thick. Trust me, I've ruined a few batches. Set dehydrator to 115 degrees F and allow to dry for 8 to 15 hours, until very crispy.

If you are comfortable leaving your oven door open and do not own a dehydrator, you might try setting the oven to lowest setting, leave the door open and dehydrate overnight, rather than trying to bake them, which won't work.

Store in ziplock bags or airtight containers.

1 Comment

Crsipy Nuts Recipes

4/7/2013

0 Comments

 
Picture
I am a self proclaimed nut-aholic:) But, did you know nuts can be difficult to digest? Even raw nuts. So, if you have the time and want to eat nuts in a way that may be kinder to your digestive system, I invite you try making some crispy nuts. This is on the easiest recipes I make. I literally come home from the store with some raw nuts or I order them from Azure Standard (no, I don't get a commission for telling you how to save money by ordering from Azure:) ), and I throw the nuts in a bowl of water with some good salt and allow them to soak overnight. What does this accomplish?

 When you plant a seed in the ground, you must first
water it in order for it to grow. The nut/seed has a protective coating on it that
keeps if from germinating before the proper time. This coating contains enzyme
inhibitors which basically keep the nutrients safe and largely unavailable for
nourishment until the time comes for the seed to become a plant. When soaked,
the enzyme inhibitors are washed away and the nutrition packed inside the seed
wakes up and comes to life. The seed (or nut) begins to use up the fat for fuel.
It becomes a living food full of live enzymes and nutrients that are readily
available to the one who consumes it. Soaked nuts are much more easily digested
than their un-soaked counterparts.


In his book, Rainbow Green Live
Food Cuisine
, Dr. Gabriel Cousens includes a very helpful chart that shows
how long to soak each different type of nut or seed. Seeds are smaller and
generally require less soaking time, such as four to six hours. Nuts on the
other hand are larger and tend to require eight to twelve hours. You can visit
www.thesproutpeople.com for a great source of sprouting seeds as well as information on
soaking times. When I buy nuts and seeds, I throw all the seeds in one bowl and
all the nuts in another. I add a teaspoon of sole or some plain Celtic or
Himalayan salt, about a teaspoon. I soak them overnight and then rinse them and
put the whole batch in my dehydrator. I dehydrate them for 6 – 12 hours and then
place them in Ball jars in my cupboard. This way, I eliminate the need to soak
nuts too often. You can use these in trail mixes, granola, raw crackers, for
grinding into flour or simply to munch on as you like. You can even flavor them
before dehydrating. I like to make cinnamon toast nuts or chili lime. Just
sprinkle any seasonings you like over the nuts after rinsing and before
dehydrating. You can also bake them at your oven’s lowest temperature. They
taste just like roasted nuts, but are far more nutrient dense. 

Here are two recipes for you:

Crispy Nuts Basic Recipe

Makes 4 cups

Ingredients

4 cups raw nuts such as walnuts, almonds, pecans, macadamia, cashews or peanuts.
Use organic, raw nuts for this recipe.

2 tsp salt

Pure water such as filtered or spring water

Instructions

Place nuts and salt in glass bowl covered with after for 7 - 8 hours or overnight. I do this in the morning and dehydrate at night or soak them when I go to bed and dehydrate in the morning. Drain nuts in colander. If using a dehydrator, place nuts evenly
on trays and dehydrate at 115 degrees F for about 12 - 24 hours, until fully crispy. If using an oven, spread nuts on stainless baking pan on lowest oven setting. Bake for about 12 hours or until completely crispy. Turn once in a while and watch for doneness as oven temperatures vary. Allow to cool. Store in airtight container at room temperature.

Maria’s Un-Roasted Pumpkin Pie Nuts
My kids beg me for these!

Ingredients

2 Tablespoons Xylitol or Raw Honey (melted on low temp)

3 scoops stevia powder

2 teaspoons vanilla

Liberal amount of Himalayan salt, 2 tsp - 1 TBS

2 heaping teaspoons pumpkin pie spice

2 cups soaked, raw nuts of choice, walnuts are
  great, soaked overnight, drained and
  rinsed

Instructions

Place soaked nuts and all ingredients in a bowl
to marinate. Let sit for two hours. Place on non-stick sheet or parchment paper
in dehydrator or on a cookie sheet in oven on lowest setting with the oven door
left open. Dehydrate until crisp and roasted-like, 12 - 24 hours.

For an amazing trail mix, combine crispy nuts with coconut flakes, dried fruit and
dark chocolate chips.


0 Comments

20 of My Favorite Snacks to Stay Slim, Healthy, and Vital

1/27/2013

2 Comments

 
For some reason, finding healthy snacks seems daunting to many, even me at times. So,
I jotted down my top 20 favorite healthy snacks on the run. Comment below to let me
know what you munch on between meals.

*1 ounce of raw milk cheese with some apple slices

*Celery with nut butter

*Whole milk, live culture yogurt with blueberries

*Carrots and hummus

*Guacamole with carrots, jicama and celery

*Pumpkin seeds, walnuts
or any other nut or seed with a piece of fruit

*Trail mix with unsweetened,
dried fruit, shredded coconut and dark chocolate chips

*My homemade almond seed crackers with
raw milk cheese

*Bone broth with beef gelatin and any veggies such as
zucchini, cauliflower, onion, greens, carrots, celery, parsely, green beans,
broccoli, etc... ( I usually choose three and make 4 qt. of soup at a time with
2 cups broth and water to fill pot - cook 20 minutes on stove) blend into a
drink and sip warm!

*Green Smoothie

*Avocado with fresh lemon juice,
Celtic or Himalayan salt and cayenne to taste

*Organic, air popped popcorn
with organic or raw butter and good salt

*Glass of almond milk with stevia
and vanilla

*Raw milk

*Raw milk kefir

*Raw sauerkraut with olive oil,
good salt and dijon mustard

*Hard boiled egg with salt

*Beef jerkey from wild or
pastured meat and seasoned with good salt

*Leftovers from yesterday
2 Comments

    Categories

    All
    Beverages
    Breakfast
    Conscious Kids
    Dinner
    Dinner
    Dressings
    Eft
    Emotional Eating
    Entrees
    Essential Oils
    Gluten Free
    Green Smoothie Challenge Recipes
    Healing Recipes
    Healing Recipes
    Health Articles
    Healthy 4th Of July Recipes
    Healthy Snacks
    Healthy Treats
    Holiday Recipes
    Mindfulness
    On Being Human
    Phase 1 Fungus Link
    Relaxation And Stress Reduction
    Side Dishes
    Smoothie/juice Recipes
    Snack Recipes
    Soup
    Weight Loss

    Picture
    Chichen Itza, Mexico 2015


    Author

    Hi, I'm Maria. I practice hypnotherapy and holistic coaching specializing in emotional eating, addictions, depression, anxiety and PTSD. I LOVE what I do! One of my goals is to be in the Guinness Book of World Records for doing headstands in the most places around the globe! I have a love affair with butter and red wine and all REAL food Mother Earth lovingly provides her inhabitants. I collect recipes, hoard books, scavenge for heart rocks and go totally crazy when my 4 kids try to talk to me all at once. My favorite pastime is witnessing people realize the miracles in every moment and reminding myself to do the same. I love silence. I am a lover, a mystic, seeker of the Divine, a Warrior of Light, Alchemist. Welcome!

    RSS Feed

    Archives

    October 2017
    March 2017
    October 2016
    June 2016
    May 2016
    April 2016
    March 2016
    February 2016
    October 2015
    January 2015
    December 2014
    November 2014
    October 2014
    September 2014
    June 2014
    May 2014
    March 2014
    February 2014
    January 2014
    December 2013
    November 2013
    October 2013
    September 2013
    August 2013
    July 2013
    June 2013
    April 2013
    March 2013
    February 2013
    January 2013